Blog
Misconception of lessons learned
There is a general misconception regarding a lessons learned session in a projects. Most of lessons learned sessions focus on what is going wrong. This way even the most well executed and lucrative project can look like a sick patient.
Let's talk about the key aspects of lessons learned.
The goal of any a lessons learned session is to find the key success elements and also things to improve.
First of all you should invite your whole team to a lessons learned session, which usually will last between 4 and 6 hours. Also announce the session in your company in advance to prevent any interruptions.
All you need for the session is a whiteboard to write down suggestions from the team members and a comfortable room.
A classic way to start off is to ask “What should we do different and what makes us so good?”. Every team member should give a suggestion, which you will write down on the whiteboard. To prevent some members from dominating the discussion, allow only one suggestion at the time and then pass to the next team member. Usually this will go for three to five rounds, depending how many team members there are.
You also do not have to wait with the discussion till there are no more suggestions. Allow discussions right away - this will uncover deeper ideas. Also, remind your team members to focus on positive and negative aspects - for some reason most people tend to see the negative first, which can overweight the whole process.
After all the suggestions are written on the whiteboard and discussed it time to vote. The first vote is given to the positive suggestions, the second on things to be improved. Every team member has three votes for the positive and three votes for the negative aspect. Mark the votes with a check mark or point next to the suggestion. It is also possible to give two or even three votes for only one suggestion.
After the voting, select the top three positive and three negative aspects for the protocol. You should also keep all the other suggestions for future reference. Now you and your team can work on the voted suggestions till the next lessons learned session.
10 YEARS AGO
My iOS Meetup Talk: Appreneur - a book summary
A compact summary to the book “Appreneur” (written by Taylor Pierce) from my iOS Meetup Talk about app entrepreneurship and app market.
10 YEARS AGO
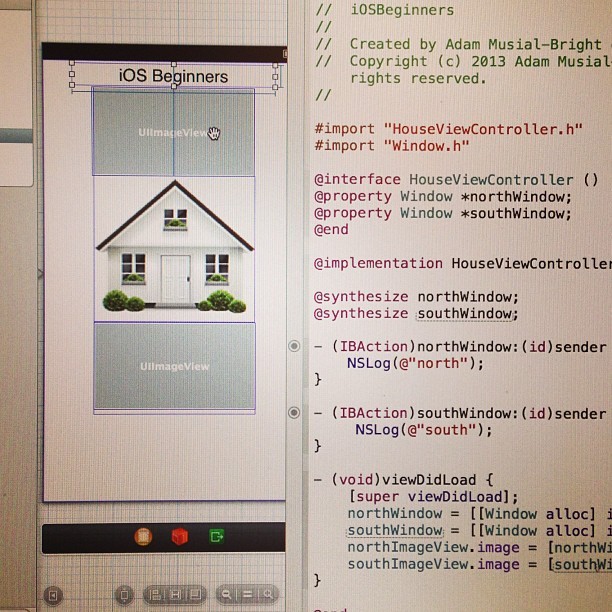
My iOS Meetup Talk: Objective-C for Beginners and iOS developers
Objective-C for Beginners: Classes, Protocols, Delegates
10 YEARS AGO
Daily Scrum - 10 Most Important Minutes
For many developers the daily scrum meeting might sound like every day pain in the a*$. First of all, you mention “stuff”, work tasks, things from yesterday everybody should know about. Second you repeat these again today. And third you do not want to mention any problems - so negative in the morning. It feels like a waste of time and you have to hurry with breakfast (if any) to be on time. So why do this?
Doubt #1: Why?
Let's think again: why do we do it? Well, you want to take a minute and sum up what you did yesterday. If it is easy and straightforward - good. Seems like you are organised and accomplish a goal/user story - so positive! Next, suddenly you (should) have a plan a general plan for today. Feels like it will be a productive day. And by the way, your buddies know what you working on - plus you know what they do. Maybe there is some solution, somebody already did in a previous project you can just re-use? - Might be a nice short day! Finally, the third part: do you have trouble with something. Even so it is not that bad as you might think. By being “forced” to talk about it, you can not wait too long for help. So, it is actually a safety net.
Doubt #2: Public speaking does not work for everyone
For many, public speaking is actually real problem, even in front of family, friends or coworkers. So why this trouble every day? Well, it is a great opportunity for everyone to learn how to speak in front of a small team in a fairly safe environment. Also, this will improve the teams communication skill on phone calls or demo days with the customer. Pretty quickly everybody should get comfortable. If not, the scrum master should provide trust and support the “scaredy cats” in the team.
Doubt #3: It is still a poisonous meeting
You could say, that even if doubt 1 and 2 aren't true, iit still a meeting and meetings are just distracting. Well, yes, meetings are distracting, but not this one. It should be held in standing position - no comfortablly sitting for a long time. It should be time-boxed (10-15min long). And do not forget that there are a lot of very positive side effects for every team member, like being comfortable tackling a complex task knowing you have a very trustful and supportive team behind you.
From my experience as a scrum master you should encourage, motivate and empower your team to take part in the daily scrum. Do not forget to follow the rules: what did team member do yesterday? And today? Are there any problems? The meeting should take only 10-15 min. It will be worth it!
11 YEARS AGO
Project retrospective - why and what should we talk about?
You just finished a project and decided to do project retrospective. Personally, I think it is a great chance to recap how the work went and what lessons we learned - sounds like a good idea.
In general, a project retrospective helps to optimize teamwork, communication, creates more fun and better results during a project - especially if it is a long project. But even for short projects it makes sense to have a retrospective at the end, so you and the team get new insights what went well and to do better. At the end there are always lessons to be learned.
My first question was - who do I invite?
Having a double role, namely team leader and core software developer in this particular project, I first thought about the development team. But then it occurred to me that there where many more influences, such as my boss, the designers and, of course, the sales representatives.
#1 So the first rule: invite all participants.
I planned a meeting for one hour. Next, the agenda: what should we talk about?
A retrospective is an open discussion. You and your colleagues are invited to share thoughts, experiences and come up with lessons learned. So the general form is pretty open. I decided to give a short introduction: why we are doing a retrospective and what it is about.
To get the ball rolling, I first explained the concept and gave them a wide selection of topics:
- Implementation / tech
- Team communication
- Customer communication
- Finances
- Product/development quality
- Tools
The wide range of topics is to help to draw all participants into the conversation and start sharing their thoughts.
#2 So the second rule: provide a wide range of topics about your project.
Now how do we all share our project experience and come up with lessons learned?
Until now nobody had said anything except for me. I kept the introduction really short and simple - about seven minutes.
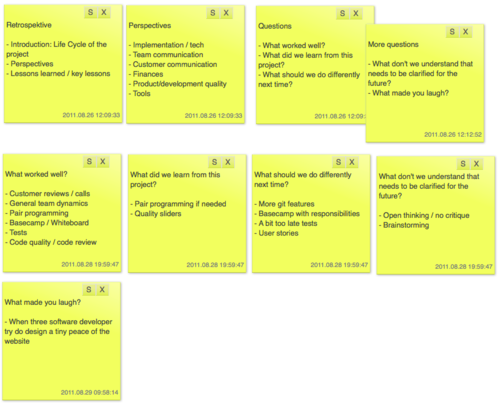
The tricky part: Start talking about your project experience by using standard questions like:
- What worked well?
- What did we learn from this project?
- What should we do differently next time?
- What don't we understand that needs to be clarified for the future?- What made you laugh?
I read the first question and answered it from my perspective. Then I asked the colleague to the right to tell his story and so on. It took about two hours for the seven of us to answer all five questions. It was amazing how much you can learn about yourself and your colleagues, team dynamics and for the next project.
#3 So the third rule: prepare questions, start talking and then sit back and listen to what your colleagues have to say.
In the whole retrospective talk we used a digital whiteboard which at the end looked like this:
11 YEARS AGO
User Centric Development - Software for Humans
There is software, there are apps and services out there, that we use and love. And there is also software I hate using. But what makes such a difference between good and bad software?
Focus on key functions
I remember the first iPhone apps I started to buy and download for free. At the beginning I was wondering how “little” these apps could do. One or two main functions and that's it. But very soon I recognized a difference in my behavior. Somehow using this “simple” apps was simpler, quicker, more effective and fun compared to the desktop counterparts with one thousand extra functions you never need.
Software should be easy to use … everybody says so but where is the difference? The simplicity is not only in the self-explanatory design of buttons and functions. In my opinion it is in the focus on the desired service. All software, on a big screen or in my pocket in the iPhone, should have a clear function and focus on the service it suppose to provide. If it's photo software, focus on three things: simple photo shooting, scaling/corrections and sharing (just an example) - that's it. No crazy categories, 10 attributes for naming, tagging and categorizing. Of course there will be a professional photographer who needs this kind of functions, but he will use a different camera so you do not need to care about him.
Focus on the extreme user when it's about usability
Do not think too much about the “average” user - whoever he or she might be. At the beginning it sounds contradictory, because the software should be for a big customer group. Developing software you should focus on the extremes (I recommend the documentary Objectified for deeper understanding of this matter). Users with shaky hands should be able to click or touch buttons in your app. User who are distracted on a subway should be able to shoot a photo, make a simple correction and share it between two stations.
User-centric development
Speaking of users, this might be the hardest part - especially for technicians around us. It is fun to implement a very new function using the newest technique. This is fine as long it has a clear practical use for the end user.
Take “Design Thinking”. The theory says, that every product should be balanced around desirability, feasibility, and viability. There should be a clear desire and outcome for the end user to use the product. The product should be realistic from the economic standpoint, and it should be feasible - so no hovercraft skateboard please.
11 YEARS AGO
Workout Time - the Positive Habit
The overlooked beauty
We all dream of this: a healthy, well functioning and good looking body. It is by far the best tool you will ever use in your life. Every step, every jump, every handshake, dance, or run you do - it's amazing, think about it. We easily forget what physical and skill learning potential our bodies have - watch Cirque de soleil once and you will know.
The reality
For years (well, decades) engineers have been developing humanoid robots like Asimo and others and it is still amazing how difficult it is to make them walk efficiently. Now think about what great gift your body is.
The history
This is not a new revelation. In the 2nd century AD a Roman poet Juvenal answered to the question of what people should desire in life "Mens sana in corpore sano", which roughly translated means “a sound mind in a healthy body”. This thought may sound old fashioned and ... well you are so wrong.
The positive side effect
No matter if your goal is your attractiveness, a marathon run or being able to sustain a real go-kart race (which is amazingly exhausting!), having a healthy and fit body has not only physical advantages - it is also one of the best tools to stay mentally capable and even increase your intelligence. Forget sudoku, it only increases your ability to solve another sudoku and do not increase your overall intelligence, as Andrea Kuszewski in Scientific American explains: "Individual brain training games don't make you smarter". The convenient way to increase your intelligence as a positive side effect is challenges (leaving your comfort zone), networking (i.e. deep discussions with friends & CO), music (active instrument playing) and sports (real movement, not computer gaming).
The pain x 3
For most of us - me included - regular workout is hard. Not only it requires time but also motivation and mental endurance.
1. Time
Lets talk about time. The general thinking about exercise is: well, I have no time. If you are really honest with yourself: you have time for TV, you have time for Youtube videos, you have time for browsing the web without any goal. This list could go for a long time. The truth is, time is not the true challenge: it is the motivation.
2. Motivation
Lets talk about motivation then. Motivation is tricky. First we are very easy to cheat when it is about slow changes and lack of feedback. Every body change is a slow process. No matter if it is a negative effect like gaining weight, becoming less flexible, backpain or deconditioning. The positive effect such as high energy level, attractiveness, weight lost or increased health - the result comes very slowly and this is where most of us lose motivation.
You want to create a flow effect. It is a feeling of full focus on what you are doing, which is also connected wih immediate feedback. I think the best way to motivate yourself with a practical goal, something like: I want to be able to walk three flights of stairs without being out of breath; I want to look attractive; I want to lose weight to a healthy level; I want to run a half marathon; I want to play tennis every week; you name it.
In my case the motivation was: I want to be able to protect myself. Since 1999 Jiu-Jitsu (and other martial arts) became my workout. It is great in conditioning, power, coordination, networking with other people and amazing atmosphere, but most importantly self-defence.
3. Mental endurance
That is a hard one. The classic effect of new years resolutions: I will sign up for a gym and lose weight to a healthy level. Well, for many this dream last for about 4 weeks. January is the month where the local gym is always full of new faces, which vanish in february.
Due my consulting trips to customers for couple of days every few weeks, jiu-jitsu is not possible for me in my local dojo during traveling times. Being on the road is also kind of hard for problem #2: motivation. To attack # 2 and # 3 I used a simple interval training, which might be also the right thing for you. An interval training is a set of exercises like sit-ups, squats, push-ups, pull-ups, burpees and many others. Each exercise/set takes a fixed amount of time, lets say 50 sec. Between each set you plan a fixed break time (lets say 50 to 0 sec). To help you keep track of time I have written a free online workout timer webapp. The best part: you warm up for few minutes, set the set and rest times in the workout timer, hit go and do your exercise. No counting repetitions and there is even a voice telling you when to rest or start another set - very convenient and most importantly interval training is short 15 to 25 min. Because it's automatic, the exercise feels short (you practically forget it and do the exercises one after another like a machine) - motivation included - just try it.
The gain
From my point of view the three most important arguments for working out are:
- health
- personal goal
- looks
Make it a positive habit.
What we did not talk about
11 YEARS AGO
Deploy Java RESTful Application on the Google App Engine
I am a big fan of the Google App Engine (GEA) - which for me is the best PAAS on the market. The native support of Java, Python and recently also Go makes it a popular choice. It is also possible to implement applications in languages like Scala, JRuby, Clojure, Groovie … which all run on the Java Virtual Machine.
In this short article you will learn all the steps needed to deploy a RESTful application on GAE implemented in Java and Jeryes REST framework.
Libraries
First of all you need a Google account which after registration automatically allows you to deploy 10 applications
Development Tools
Next step is to install Eclipse IDE, GAE Eclipse plugin, and the Jersey REST framework. In Eclipse you will develop your application which you can easily deploy via the GAE Eclipse plugin. The Jersey REST framework supports you in RESTful services development.
New Project
After you run your Eclipse IDE with the GAE Eclipse plugin create a new Web Application Project and import all Jersey jars from the Jersey lib forlder (asm.jar, jersey*.jar, jsr311-api-1.1.1-jar, asm-3.1.jar and jackson*.jar) into the /war/WEB-INF/lib folder.
Setup
Configure Jersey in /war/WEB-INF/web.xml:
  <web-app>

  <init-param>
      <!-- speed up initial Jersey loading by deactivating WADL -->
      <param-name>com.sun.jersey.config.feature.DisableWADL</param-name>
      <param-value>true</param-value>
    </init-param>

    <servlet>
      <servlet-name>Jersey Web Application</servlet-name>
      <servlet-class>
        com.sun.jersey.spi.container.servlet.ServletContainer
      </servlet-class>
      <init-param>
          <param-name>com.sun.jersey.config.property.packages</param-name>
          <!-- Enter your Jersey resources to speed up initial Jersey loading -->
          <!-- You can separate the java packages using , -->
          <param-value>com.your.api</param-value>
        </init-param>
        <load-on-startup>1</load-on-startup>
    </servlet>

    <servlet-mapping>
      <servlet-name>Jersey Web Application</servlet-name>
      <url-pattern>/</url-pattern>
    </servlet-mapping>

</web-app>
Simple implementation
Test it with this simple REST service. Save the file in the package com.your.api, so the com.sun.jersey.config.property.packages from the web.xml example works out of the box.
 package com.your.api;

 import javax.ws.rs.GET;
 import javax.ws.rs.Path;
 import javax.ws.rs.Produces;

 @Path("/api/info")
 public class InfoResource {

   @GET
   @Produces("text/plain")
   public String info() {
     return "Hello Jersey on Google App Engine";
   }

 }
Run
Run your project in Eclipse by hitting the Run button. GAE Eclipse plugin comes with the Jetty application server - which is also used by the GAE. Type in http://localhost:8080/api/infointo your browser. You should see a “Hello” message. Now you can implement your application business logic and try it out this way.
Deploy
Deploy your app in the Google App Engine. First you have to go to the Console and create a new app. Choose wisely here - you will not be able to change the app name later - but probably when you are done with your application you will map a domain to your app anyway. The application name you choose - let's say myapp - will be accessible onhttp://myapp.appspot.com and also the ssl version https://myapp.appspot.com Now edit /war/WEB-INF/appengine-web.xml and enter the application name here
<application>myapp</application><version>initial</version>Now hit the button Deploy App Engine Project and after a moment you app will be online. From now on - you will purely focus on development - no server/infrastructure configuration needed - and that ist the beauty of PAAS.
11 YEARS AGO
From pain & desire to a solution or How to Implement Tools You Need
Pain
Taking notes, organizing ideas - two tasks I repeatedly do and need for my daily work. But putting these notes back into my thought structure after couple of days or weeks is frustrating. This is, or let's say, was my pain.
Desire
What I needed was not a fancy drawing board but a simple way to save some text or a list of todos online. Well, I tried a few online notebooks and sticky note apps. Pretty early on it became obvious the sticky note apps were a much better solution - simple to write notes, easy to order priorities (I usually put the important sticky notes in the upper left corner, the less important on the bottom). But after a few weeks of usage I discovered patterns, which started to worry me.
First, there were more and more sticky notes on the screen, it became hard to find the important ones. Second, I needed an unique screen of sticky notes for different projects or ideas.
Solution
After few weeks I started to think about creating my own sticky note webapp. The key focus was on simple usage, multiple sticky notes screens/whiteboards and a possibility of hiding (or stacking) stickies, thus making it easier to find the important ones.
Platform
Well, this was a tricky part. The first idea was just to use a virtual server with a Apache/Glassfish, Java or Ruby on Rails and MySQL stack and develop the app and monitor the the server later. What I love in this process is development, what I hate is administration. When the webapp is implemented and deployed, I do not want to check/monitor if the server is still running and scaling my application. I want a way to develop quickly and easily deploy new features.
To find the right environment I started to focus on platforms, such as the Google App Engine (GAE) or Heroku. Just by pricing the GAE seemed much more reasonable then Heroku but in general the important lesson here is - use a platform as a service.
Name it, let's say yommoo
After few days I had the basic javascript sticky note implementation (jQuery + jQueryUI), some backend storage (Nucleus/Big Table) and authentication (build in Google User Service for Authentication) up and running. Also a domain came quicklyyommoo.com. From the beginning on, the access was public. I got a lot of user feedback, recommendations and also bugs sent to me, which really helped on usability.
Lessons learned from building yommoo
- Choose an environment/platform with server/data scalability and minimal administration
- Use simple frameworks, in my case jQuerUI and Jersey
- Do not overengineer, just stick to simple cheap solutions
- focus on three key features - that's it (in my case, multiple sticky note screens/whiteboards, simple lists and sticky hiding/stacking)
- build user-centric - get users early and listen what they have to say regarding your three features and forget the rest
- did I say focus on three key features?
11 YEARS AGO
Javascript apps or: How I Learned to Stop Worrying and Love Backbone.js
Simple question: How to create this simple backbone app?
No one simple answer, because there are so many ways. You can find many backbone tutorials on the internet, but somehow they do not feel simple enough for starters.
When developing an webapp you will start with some html markup amd css styles from a designer. From there on, it is you job to create a view and a model and glue everything together.
n this very short and simple backbone tutorial I would like to give you a feeling of how to structure a super simple javascript app and how to implement the view and model. We will implement a simple person app, which simply shows a person's data on a webpage.
This tutorial is also available for download at https://github.com/musial-bright/backbone-mini-tutorial
Lets get started
Lets assume you got this markup from a web designer:
<div class=“person”>
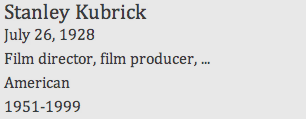
<div class=“name”>Stanley Kubrick</div>
<div class=“birthday”>July 26, 1928</div> <div class=“occupation”>Film director</div>
<div class=“nationality”>American</div>
<div class=“active_years”>1951-1999</div>
</div>
which rendered in your browser looks like this:
Well, lets start with the file structure. Create the following file and folders
/index.html
/javascript/app
/javascript/vendor
The index.html file is the page we want to render the backbone app, which will be mostly implemented in the app folder. The vendor folder is the place for all the javascript libraries needed for this mini-project.
1. First download the libraries
Download the following libraries and store these in the /javascript/vendor folder.
- jQuery: jquery.com
- Underscore lib: underscore-min.js
- Backbone lib: backbone-min.js
2. Reference all libraries in the header
Now reference the libraries in the index.html header like this:
<script type=“text/javascript” src=“javascript/vendor/jquery-1.7.2.min.js”></script>
<script type=“text/javascript” src=“javascript/vendor/underscore-min.js”>
<script type=“text/javascript” src=“javascript/vendor/backbone-min.js”></script>
3. Create app structure
For the backbone app we need a view and a model to visualize and represent the person's data. The view and model will have its own file in the javascript/app folder: person-view.js,person-model.js, where the class implementation will be done.
A template will be needed for the person.view.js view, which we will call person_template. The easiest way to do this is to put the template at the end of the body tag in the index.htmlfile.
<script id=“person_template” type=“text/template”>
  <div class=“name”><%= name %></div>
  <div class=“birthday”><%= birthday %></div>
  <div class=“occupation”><%= occupation %></div>
  <div class=“nationality”><%= nationality %></div>
  <div class=“active_years”><%= active_years %></div>
</script>
As you can see, the template has simple HTML markup and additionally references to the model attributes like access to a person's birthday:
<%= birthday %>To keep it tidy, a person-app.js will be implemented, where the view and the model will be instantiated.
Now your file structure should be like this:
/index.html
/javascript/app/person-app.js
/javascript/app/person-model.js
/javascript/app/person-view.js
/javascript/vendor/backbone.js
/javascript/vendor/jquery.js
/javascript/vendor/underscore.js
4. Implement the view
Let's implement persons view in /javascript/app/person-view.js
(function($) {

  PersonApp.View.Person = Backbone.View.extend({
    tagName: "div",
    className: "person",

    initialize: function() {
      _.bindAll(this, 'render');
      this.model = this.options.model;
      this.model.bind('change:name', this.render);
      this.model.bind('change:birthday', this.render);
      this.model.bind('change:occupation', this.render);
      this.model.bind('change:nationality', this.render);
      this.model.bind('change:active_years', this.render);
    },

    render: function() {
      this.template = _.template($('#person_template').html());
      $(this.el).html(this.template(this.model.toJSON()));
      return this;
    }

  });

}(jQuery));
First, we create a class named PersonApp.View.Person based on a Backbone.View. If you look again at the markup we got from the web designer, you will find the
<div class="person">There is a lot going on in the initializer. First, the underscore library binds the render function - which renders the whole person view. Every backbone view has an options parameter, which is a simple hash or object passed to the view when instantiated (check person-app.js).
this.model = this.options.model;In our case the model is passed on. Each of the models attributes, such as name, birthday, … is bound to the render method, so when the model gets changed, the whole view will be updated.
this.model.bind('change:name', this.render);
this.model.bind('change:birthday', this.render);
// ...
The render function will render the person view. To do this a template is needed, which in our case is referenced from the index.html file by using the #person_template jQuery selector.
this.template = _.template($('#person_template').html());You might wonder what this.el is. This is the DOM element, which holds all the view and model data of the person representation.
5. Implement the model
This is an easy one. Create /javascript/app/person-model.js and paste this code in:
(function($) {

  PersonApp.Model.Person = Backbone.Model.extend({
    initialize: function(data) {
      this.set({ name: data.name });
      this.set({ birthday: data.birthday });
      this.set({ occupation: data.occupation });
      this.set({ nationality: data.nationality });
      this.set({ active_years: data.active_years });
    }
  });

}(jQuery));
Similar to the view, our person model is based on Backbone.Model. In the initializer each of the models attribute is set from a data hash.
6. Implement the app container
Now it is time to glue the view with the model.
(function($) {

  PersonApp = {
    View  : {},
    Model : {}
  }

  PersonApp.Instance = function(data) {
    this.personModel = new PersonApp.Model.Person(data),

    this.render = function(selector) {
      this.personView = new PersonApp.View.Person(
        { model: this.personModel }
      );
      $(selector).html(this.personView.render().el);
    }

  }

}(jQuery));
As you can see on the top we have create a hash/object for our PersonApp, which contains a view and a model attribute. This is recommended for a nice and clean app structure.
The PersonApp.Instance is a simple javascript class, which consumes a data object. This data object is a simple person representation as hash (check next chapter), which will be passed on to the model.
The render function instantiates the view and passes the model. Finally, the rendering will be executed.
7. Integrate the app into the page
First let’s reference our app in the index.html header section:
<script type=“text/javascript” src=“javascript/app/person-app.js”></script>
<script type=“text/javascript” src=“javascript/app/person-model.js”></script>
<script type=“text/javascript” src=“javascript/app/person-view.js”></script>
Next we will create a persons data hash, which i.e. might come from a web service. Finally a new instance of the person app will be implemented and the render function executed.
$(document).ready(function() {
  // person JSON data you get from a web service or similar
  var data = {
      name: 'Stanley Kubrick',
      birthday: 'July 26, 1928',
      occupation: 'Film director, film producer, ...',
      nationality: 'American',
      active_years: '1951-1999'
  }

  // the backbone app
  window.personApp = new PersonApp.Instance(data);
  window.personApp.render('.render_backbone_here');
});
Reload your page and you should see the Stanley Kubrick rendered in it - good job.
Use the console and play with the model/view binding
To understand the real advantage of this simple application open your browsers console and type in
personApp.personView.model.get('name')
>> "Stanley Kubrick"
As you can see, you can access the model any time you want.
personApp.personView.model.set({ 'name': 'Put you name here' })Now this is exciting: by changing the model the view has been updated in the browser due the binding we have done in the PersonApp.View.Person class!
What is missing here?
What you have seen till now is a very simple backbone app which should already help you to write nice javascript apps. The backbone model is a very powerful class. It implements a REST client to access a RESTful web service, so you could create, fetch, update, and delete your data using something like
// save the model data
model.save()
There is also a routing implementation, so the backbone app reads its state from the url.
After you familiarized with the view and model implementation I recommend to study this topic.
11 YEARS AGO